If you’re running a WooCommerce store and selling custom products, there’s a good chance you’ve thought about giving customers more control over how their item looks. For that, we found the product designer for WooCommerce, which lets shoppers personalize items such as t-shirts, mugs, phone cases, and many other products right from your store. They can add clipart, text, and maybe even upload their image, depending on what you allow.
WooCommerce itself is built for selling stuff online. It’s powerful and flexible. But it doesn’t always do everything out of the box. That’s why store owners add plugins to make it do more. A product designer plugin is one of those add-ons. It fits into the store and lets you offer more than just basic options like size or color.
When you add a designer tool, you’re not just putting extra buttons on the page. You’re giving people a way to make something that feels theirs. It makes sense, too, if you’re in print-on-demand or personalized gifts. Rather than giving customers what you deem fit, you allow them to decide what they want. In 2025, that is everything a customer wants: personalization at their fingertips. Not everyone wants the same copy-paste product anymore.
What We Liked Most About the Product Designer Plugin
After testing the product designer inside our WooCommerce store, some features stood out. It’s not just about letting customers click stuff. The plugin gives useful tools that make customization easy and not confusing.
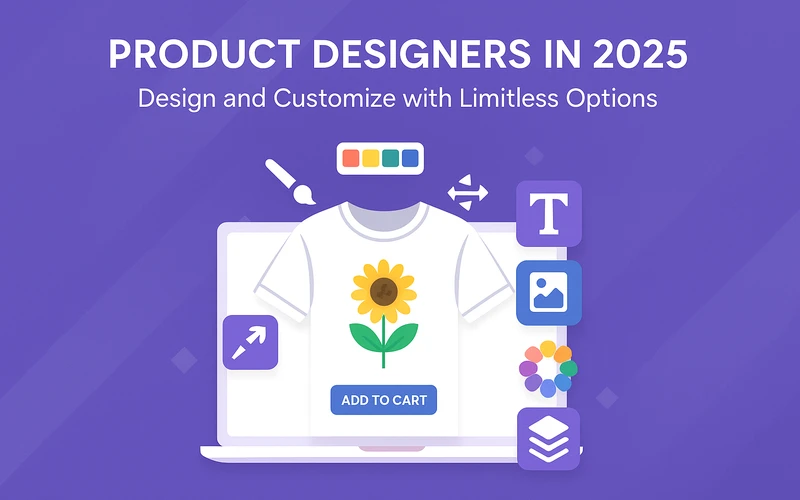
- Clipart and Text Tool: Customers can drop in clipart from your library or type anything they want. It loads fast and works on mobile too, which is solid.
- Image Upload Option: They can upload their pictures right there. Makes a lot of sense for stores that sell personalized photo products like pillows or hoodies.
- Live Preview: This one helps a lot. Whatever customers change, they can see it update in real-time. No need to reload the page or guess what it’ll look like.
- Layer Control: The drag and arrange tool is easy. Customers can move their items around and reorder layers just like editing a basic image.
- Custom Pricing Rules: You can charge extra for text, clipart, or image uploads if you want. That’s useful when custom printing costs more.
Everything we tested worked smoothly with most themes and didn’t mess with the regular checkout. That’s important when you don’t wanna spend time fixing conflicts after every update.
Why We Picked the Extendons Product Designer Plugin
There’s no shortage of product designer plugins out there. We looked at quite a few. Some had too many steps to set up. Others looked good but didn’t play well with real orders or didn’t show the preview right. But the one that stood out for us was the one from Extendons.
What worked in Extendons’ favor was how simple it was to get running and how stable it stayed through testing. Features like clipart tools, text editing, and image uploads all worked without breaking the product pages. It didn’t slow down the site either. The settings area was also easy to follow, even for someone who hasn’t used a product designer before.
We liked that it didn’t try to do too much. It sticks to what matters—letting the customer personalize products without making it messy. Plus, pricing rules and design layers were easy to control.
Of course, we’re not saying it’s the only option out there. Some other decent ones include the product designer plugin from Addify and even WP Configurator by WordPress developers. They have their ways of doing things. If you’re testing for a specific use case, maybe try those too. But in our experience, for general store use with fewer setup headaches, Extendons was a solid pick.
Installing the Plugin the Right Way
Getting the WooCommerce product customizer up and running isn’t hard. Just follow the steps one by one, and you’ll be good to go.
1. Get the plugin zip file
Once you buy the plugin from Extendons, they’ll give you a zip file. Download that and keep it ready on your desktop or somewhere you can find it quickly.
2. Go to your WordPress dashboard
Login to your WordPress admin area. From the left menu, click on “Plugins” and then press “Add New.”
3. Upload the plugin
At the top of the page, you’ll see an “Upload Plugin” button. Click that. Now hit “Choose File” and pick the zip file you downloaded earlier. Press “Install Now.”
4. Activate it
Once it installs, click the “Activate Plugin” button. That’s it—it’s installed.
5. Go to settings
You’ll now see a section in your WooCommerce settings labeled “Product Designer.” That’s where all your setup and customization happens. You can choose the products that should be allowed for customization, along with the tools that will show up, such as text, images, colors, layers, and other items.
If you are new to it, just try setting it up for one product first. See how it works, test it in the cart, and then go from there. No need to go all in at once. This way, you get the hang of it before adding it to your whole store.
Wrapping It All Up
Adding a product designer to your WooCommerce store in 2025 just makes sense now. People want more control over what they buy, and they expect to make changes that reflect their ideas or needs. Doesn’t matter if it’s a t-shirt, a mug, or some digital print. If you can give them space to customize it, it helps with sales.
There’s a bunch of plugins out there that do this job. We tried a few, but the one from Extendons just worked better for us. Setup wasn’t hard. Features were clear. And it did what we needed it to do without wasting time. The real value, though, is in how it adds more options to your shop without making it too complicated.
If you’re running a WooCommerce store and haven’t tried giving users the option to design stuff themselves, now might be the right time. People like to click around and play with options. You give them that freedom, they’ll stick around longer. And that’s where the difference starts.


